The Best Fluffy Pancakes recipe you will fall in love with. Full of tips and tricks to help you make the best pancakes.
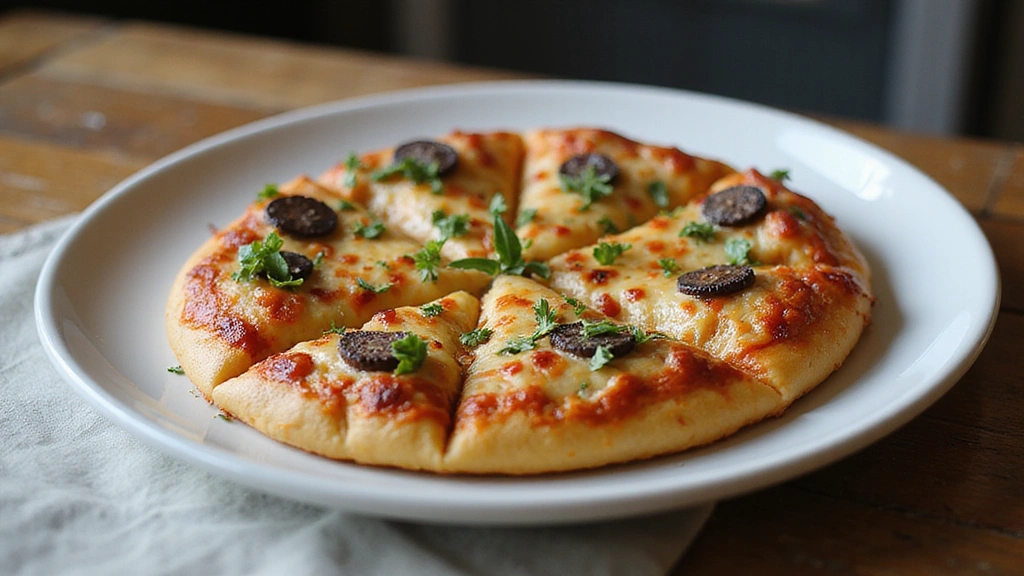
This classic Dutch Oven Pizza recipe brings the joy of homemade pizza outdoors, perfect for camping trips or backyard gatherings. The irresistible combination of a crispy crust, bubbling cheese, and fresh toppings creates a flavor explosion that satisfies every craving.

I first enjoyed this delightful dish around a campfire, where the smoky aroma and communal experience made it unforgettable. Whether you’re an outdoor enthusiast or simply love pizza, this recipe offers a unique way to enjoy a beloved classic in a new setting.
The History and Cultural Significance
- Dutch oven cooking has roots that trace back to the 18th century in Europe, particularly in the Netherlands, where it was perfected for slow-cooking hearty meals.
- The technique evolved as European settlers brought it to America, adapting it for outdoor cooking and campfire meals, making it a staple for adventurers and families alike.
- In American culture, pizza is often associated with gatherings and celebrations, making the Dutch Oven Pizza a beloved dish for events like camping trips and picnics.
- While many variations of pizza exist worldwide, the Dutch Oven Pizza method offers a unique twist, with the cooking vessel creating a crust that rivals traditional pizza ovens.

- Once the Dutch Oven Pizza is cooked, carefully remove the Dutch oven from the heat.
- Let it cool for a few minutes before removing the lid.
- Use a spatula to transfer the pizza onto a cutting board.
- Slice and serve hot, enjoying the delicious flavors of your outdoor creation.
Critical Timing and Temperature Guide
- Dough Rising: Allow the dough to rise for at least 30 minutes in a warm environment. Look for it to double in size, which indicates it is ready. Avoid rushing this step as it develops flavor and texture.
- Cooking Time: The Dutch Oven Pizza should cook for about 20-25 minutes. Check for a bubbling cheese and a golden crust, which are signs of doneness. Be cautious, as cooking too long can burn the crust.
- Cool Time: Let the Dutch Oven Pizza sit for 5 minutes before slicing to allow the cheese to set. Cutting too soon can result in messy slices and toppings sliding off.
Pro Tips for Best Results
- Ingredient Selection: Use high-quality mozzarella cheese for a creamy texture and better melting.
- Preparation Secret: Let the dough rest longer than 30 minutes for enhanced flavor and chewiness.
- Temperature Management: Ensure your Dutch oven is fully preheated to avoid a soggy crust. An instant kitchen food thermometer can help you get this part just right.
- Texture Enhancement: Use a cooking brush to brush the crust edges with olive oil before cooking for a golden, crispy finish.
- Flavor Layering: Use fresh herbs like basil or oregano in the sauce for an aromatic boost.
- Make-Ahead Strategies: Prepare your dough and sauce in advance; store them in airtight containers in the fridge for up to 24 hours.
- Restaurant-Quality Finishing Touches: Drizzle with balsamic reduction or sprinkle with fresh arugula after cooking for a gourmet touch.
- Equipment Optimization: Use charcoal briquettes for consistent heat; arrange them around the edges of the Dutch oven for even cooking.
Troubleshooting Common Issues
- Crispy Crust Not Achieved: This can occur if the Dutch oven wasn’t preheated adequately. Ensure that it’s hot enough before adding the dough and consider increasing cooking time slightly. Use a reliable thermometer to be sure of the temperature.
- Cheese Not Melting: If the cheese isn’t bubbling, your cooking temperature might be too low. Increase the heat slightly or move closer to the coals.
- Pizza Overcooked: A burnt crust can result from too much heat or cooking for too long. Keep an eye on the pizza and rotate it as needed.
- Ingredients Sliding Off: This may happen if you cut the pizza too soon. Let it cool for a few minutes to allow the cheese to set properly.
- Uneven Cooking: If the pizza cooks unevenly, try rotating the Dutch oven or adjusting the coals for more even heat distribution.
- Flavors Too Bland: This can happen if not enough seasoning is used in the sauce or toppings. Don’t be afraid to add herbs, spices, and seasonings liberally!
Variations and Regional Differences
- Chicago-Style Deep Dish: This version features a thicker crust and is baked with cheese on the bottom and sauce on top. It requires a deeper Dutch oven for best results.
- New York-Style Thin Crust: Characterized by its thin, crispy base, this style uses less dough and is stretched thinner before cooking. It can be topped with traditional tomato sauce and mozzarella.
- Neapolitan Pizza: This authentic Italian pizza emphasizes simplicity with high-quality ingredients like San Marzano tomatoes and fresh mozzarella, cooked quickly over high heat.
- Modern Interpretations: Current trends include gluten-free crusts, plant-based cheeses, and creative toppings like pear and gorgonzola or barbecue chicken.
Food Science Behind the Recipe
- Maillard Reaction: This chemical reaction between amino acids and reducing sugars gives the crust its golden-brown color and rich flavor. Proper heat management is essential to achieve this effect.
- Gluten Development: Kneading the dough helps develop gluten, which gives the pizza its chewy texture. The elasticity of the dough is key to holding toppings without falling apart.
- Cheese Melting: The fat content in cheese affects how it melts. Whole milk mozzarella gives the best melt and stretch, while lower-fat cheeses may not perform as well.
Frequently Asked Questions
What’s the most common mistake people make when preparing Dutch oven pizza?
Many fail to preheat the Dutch oven adequately, resulting in a soggy crust. Always ensure it’s hot before adding the dough.
Can I prepare components of this dish in advance?
Yes! You can prepare the dough and sauce a day ahead and store them in the fridge. Just bring them to room temperature before cooking.
How do I adapt this recipe for dietary restrictions?
Use gluten-free flour for the dough and dairy-free cheese alternatives for a vegan version.
What’s the best way to store and reheat leftovers?
Store leftovers in an airtight container in the fridge for up to 3 days. Reheat in the oven at 350°F until warmed through for best results.
Can I freeze this dish?
Yes, you can freeze the entire pizza before baking. Wrap it tightly in plastic wrap and foil, then bake from frozen at the same temperature, adding additional time as needed.
What wine or beverages pair best with this dish?
A light red wine like Chianti or a crisp lager complements the flavors of pizza beautifully.
How can I scale this recipe up for a crowd?
Simply multiply the ingredients by the number of servings needed, ensuring you have enough space and equipment for larger quantities.
What side dishes complement this recipe best?
A fresh green salad or garlic bread pairs well with pizza, balancing the meal with lightness and flavor.
How do professional chefs elevate this dish for restaurant service?
They often use high-quality artisanal ingredients and serve the pizza with a drizzle of olive oil or fresh herbs for a gourmet touch.
Serving and Presentation Guide
- Traditional Presentation: Serve the pizza hot from the Dutch oven on a wooden board, garnished with fresh basil and a drizzle of olive oil.
- Modern Plating Ideas: Cut the pizza into wedges and arrange on a rustic slate platter, with dipping sauces on the side for a contemporary twist.
- Accompaniment Suggestions: Pair with a light arugula salad dressed with lemon vinaigrette and a side of garlic knots for a complete meal.
- Special Occasion Presentation: For celebrations, top the pizza with edible flowers or microgreens for a visually stunning effect that impresses guests.
Conclusion
This Dutch oven pizza recipe is a delightful way to bring the taste of homemade pizza to your outdoor adventures. With its crispy crust and customizable toppings, it promises to satisfy any craving. I hope you take the time to try this recipe and create your own memorable moments around the fire with family and friends.
You may also like to take a look at this article: high protein food recipes
Dutch Oven Pizza Recipe Summary

Outdoor Dutch Oven Pizza Recipe
Enjoy a smoky, crispy Dutch oven pizza perfect for outdoor cooking. Whether you're camping or firing up a backyard fire pit, this recipe delivers classic pizza flavors with a rustic twist.
Equipment
- 1 Dutch oven For even heat and a crispy crust
- 1 Charcoal briquettes or camping stove As your heat source
- 1 Mixing bowl To mix and knead the dough
- 1 Wooden spoon or dough scraper To mix and handle dough
- 1 Cutting board For prep and serving
- 1 Heat-resistant gloves To safely handle the Dutch oven
- 1 Tongs or spatula To rotate or lift pizza as needed
Ingredients
- 2 cups all-purpose flour
- 1 tsp instant yeast
- ½ tsp salt
- ¾ cup warm water or more if needed
- 1 tbsp olive oil Optional for softer dough
For Sauce and Cheese
- 1 cup pizza sauce store bought or homemade
- 1½ cups shredded mozzarella cheese preferably whole milk
Optional
Optional Toppings
- ½ cup sliced pepperoni or salami
- ¼ cup chopped bell peppers
- ¼ cup sliced mushrooms
- Fresh basil or oregano (for garnish)
- Salt and pepper, to taste
Optional Finishings
- 1 tbsp olive oil for brushing crust edges
- Balsamic glaze or arugula (optional, for serving)
Instructions
Prepare Ingredients
- Gather all ingredients and place them on a clean surface. Measure everything ahead of time, and prep toppings like slicing vegetables or grating cheese.

Mix the Dough
- In a mixing bowl, combine flour, instant yeast, and salt. Gradually add warm water while mixing until a dough forms. Knead on a floured surface for 5–7 minutes until smooth.

Let the Dough Rise
- Cover the dough with a towel or plastic wrap and let it rest for about 30 minutes in a warm place until it doubles in size.
Preheat the Dutch Oven
- Place your Dutch oven over hot coals or on a camping stove and preheat it for 10–15 minutes. Test heat by flicking water inside — it should sizzle immediately.
Shape the Dough
- Punch down the risen dough to release air. Roll or press it into a circle about ¼ inch thick, sized to fit your Dutch oven.
Transfer Dough to Dutch Oven
- Carefully transfer the shaped dough into the preheated Dutch oven. Use parchment paper underneath if preferred for easier handling.

Add Sauce and Cheese
- Spread pizza sauce evenly over the dough, leaving a small border for the crust. Sprinkle mozzarella cheese generously over the sauce.
Add Toppings
- Add your preferred toppings — pepperoni, bell peppers, mushrooms, or anything you like. Spread them evenly for consistent cooking.

Cover and Cook
- Cover the Dutch oven with its lid. Cook over coals or on a stove for 20–25 minutes. Rotate the pot occasionally for even cooking.
Check for Doneness
- The pizza is ready when the cheese is melted and bubbly, and the crust is golden brown. Lift the crust slightly to check the bottom.

Cool and Serve
- Carefully remove the Dutch oven from heat. Let the pizza cool for 5 minutes before slicing. Serve hot and enjoy!
Notes
- Dough Rise Tip: For even better texture and flavor, allow the dough to rest for up to 1 hour if time allows — especially in cooler outdoor settings.
- Crust Crisping Trick: Brush the edges of the dough with olive oil before cooking for a golden, crispy finish.
- Make-Ahead Option: Prepare your dough and sauce at home, store them in airtight containers, and bring them chilled to your campsite. Let the dough come to room temperature before using.
- Cheese Alternatives: Feel free to use dairy-free cheese or a mix of mozzarella and cheddar for different melt and flavor profiles.
- Topping Caution: Avoid overloading the pizza with toppings, which can make the crust soggy and increase cooking time.
- Fire Safety: Always use heat-resistant gloves and handle the Dutch oven carefully — it gets extremely hot, especially when cooking over coals.
- No Dutch Oven? You can make a version of this recipe in a heavy cast iron skillet with a foil lid or in a covered grill setup.


